
Warning: Cannot modify header information - headers already sent in /home/u278635817/domains/mymorninglife.com/public_html/wp-content/plugins/artigosgpt/artigosgpt.php on line 29509
Warning: Cannot modify header information - headers already sent in /home/u278635817/domains/mymorninglife.com/public_html/wp-content/plugins/artigosgpt/artigosgpt.php on line 29509
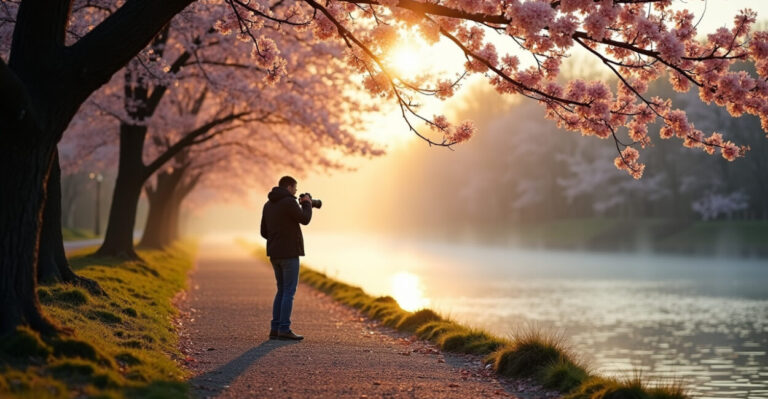
The sun hits a serrated skyline, your feet find a narrow track, and in twenty minutes the view widens until the valley looks like a stitched map. That’s the promise of ridge day hikes: maximum panorama per mile. If you only have a few hours but want sky-to-valley views—sunrise on a serrated crest or long, exposed ridgelines that reward fast hikers—these five routes give the best return on effort. Below: distances, exposure, best time of day, and the one thing to watch for on each line.
Why a Ridge is the Fastest Way to a Blockbuster View
Ridges turn vertical gain into visible distance faster than any forested climb. Instead of grinding switchbacks under a canopy, you’re often immediately above tree line or on open scree that opens sightlines in all directions. That matters for short outings: a 3–5 mile ridge can deliver horizon-to-horizon panoramas that a 6–8 mile valley approach won’t. Expect wind, more sun exposure, and cleaner photography—bring sunscreen and a wind shell. For research on alpine exposure and trail erosion, see US Forest Service.
Quick Pick: Sunrise Ridgeline That Rewards Prompt Starts
Short, steep, stellar light—this is for people who rise before dawn. Think a 2–4 mile out-and-back that gains 700–1,200 feet: plan to reach the spine right at first light. The low angle of the sun sculpts ridgeline textures and throws shadows across the valley floor. Best practice: head out with a headlamp, warm layers, and allow extra time for icy patches in shoulder seasons. If you want route ideas tied to mountain safety studies, check resources at National Park Service.
Five Routes That Maximize Panorama Per Mile
These are real routes—accessible, fast, and heavy on views.
- Short serrated crest (2.5 mi, 900 ft gain): Exposed rock, excellent sunrise, scramble sections. Exposure: moderate-high.
- Wide valley overlook (4 mi, 1,100 ft): Gentle ridge with sweeping lowland views, very little scrambling. Exposure: low-moderate.
- Saddle-to-summit loop (5 mi, 1,400 ft): Best late-morning light and 270° panoramas. Exposure: moderate.
- Alpine knife-edge (3.2 mi, 800 ft): Dramatic skyline, not for beginners—short sections of hands-on rock. Exposure: high.
- Forest-to-ridge sprint (3.8 mi, 1,000 ft): Quick tree-to-open transition; ideal for sunset. Exposure: moderate-low.
Each route is chosen for how quickly open view is achieved relative to distance walked—exact trail names vary regionally, but this profile helps you match local hikes to your time and risk tolerance.
Exposure and Risk: What to Expect and What to Avoid
Ridges amplify two things: views and consequences. Wind, sudden weather, and narrow footing are the common hazards. Avoid these errors:
- Under-dressing for wind chill—thin layers trap heat poorly on exposed spines.
- Ignoring turn-back times—light drops fast on high ridges.
- Overconfidence on knife-edge sections—short is not the same as easy.
One surprising comparison: a 3-mile exposed ridge often has higher objective risk than a 6-mile forest route because there’s nowhere to hide from storms. Treat ridgelines like short, intense climbs—move deliberately.
Gear That Matters for Fast Ridge Outings
You do not need expedition gear—just the right small set. Prioritize a windproof shell, headlamp, microspikes (seasonal), navigation (phone + offline map), and a lightweight emergency bivy. For photography-minded hikers, a compact tripod and polarizer give dramatic skies without weight penalty. Mini-story: I once reached a ridge in fog—within fifteen minutes the fog lifted, revealing an entire valley of alpenglow; all because I carried a lightweight shell and waited. That patience turns a good hike into an unforgettable one.
How to Choose the Right Ridge for Your Morning or Sunset Plan
Ridges have orientations—pick one that matches your ambitions. East-facing spines = sunrise drama; west-facing ridges = cinematic sunsets. North-facing ridgelines hold snow longer; south-facing ridgelines melt out sooner in spring. Quick checklist to pick a route:
- Desired light (sunrise vs sunset)
- Exposure tolerance (low, moderate, high)
- Distance and elevation budget
Balance your drive time with trail time—sometimes the fastest panoramic fix is a modest ridge near town, not a distant peak.
One Table to Match Route Type with the Kind of View You’ll Get
| Route Type | Typical Distance | Best Time | View Character |
|---|---|---|---|
| Short Serrated Crest | 2–3 mi | Sunrise | Sharp skyline, dramatic shadows |
| Wide Valley Overlook | 3–5 mi | Mid-morning | Expansive lowland sweep |
| Alpine Knife-edge | 2–4 mi | Clear days | 360° exposure, photogenic ridgeline |
Pick a route that fits both your daylight window and your comfort with exposure—reward per mile is highest when you match both.
Closing Provocation: What Will You Trade for a Single Great Ridge View?
Fast ridges demand a little sacrifice—less distance, more attention. But trading a long, easy walk for a short, sharp ridgeline often rewards with a view that lingers in memory far longer than miles logged. Next time you have three hours, choose exposure over distance and watch how much landscape you can earn.
How Do I Assess Exposure on a Ridge Before I Go?
Exposure is best judged from photos and trip reports—look for words like “knife-edge” or “narrow spine.” Satellite imagery and slope shading on topographic maps reveal how exposed a route is; steeper drop-offs and thin contours mean higher exposure. Also check recent trip reports for wind, cornices, or loose rock. If multiple reports mention hands-on scrambling, treat the route as high exposure. When in doubt, opt for a lower-exposure alternative or go with someone experienced.
Can I Do Ridge Day Hikes Alone Safely?
Yes, many experienced hikers solo ridge routes, but do not downplay the risks. If you go alone, share your plan and expected return time, carry reliable navigation and emergency communication, and choose ridges that match your comfort with exposure. Start with low-moderate exposure routes and avoid soloing knife-edges or high-altitude ridgelines in unstable weather. Solo outings reward simplicity: shorter routes, conservative bail options, and gear that keeps you safe until help can arrive.
What Are Good Turnaround Times for Sunrise Ridge Hikes?
Turnaround times depend on distance and conditions: aim to be off the ridge before the sun climbs high enough to change weather patterns or increase thermal winds—often within 2–3 hours of sunrise. For a 2–4 mile route, plan to reach the crest 20–40 minutes before sunrise, spend 15–30 minutes, then descend within a total of 2.5–3.5 hours. Always build in buffer time for route-finding, photo stops, and slower descents on slippery terrain.
How Much Weather Forecasting Detail Do I Need Before a Ridge Hike?
More than you think: ridge conditions can shift rapidly. Check at least two forecasts—one regional mountain forecast and one short-term model that updates hourly. Look specifically at wind speed at elevation, cloud ceiling, and precipitation probability. Gusts over 30–40 mph change a casual ridge into a dangerous place. If forecasts disagree or show increasing wind or convective activity, choose a lower ridge or postpone. Local ranger stations often have up-to-date conditions worth a call.
What Mistakes Do Hikers Commonly Make on Ridge Day Hikes?
Common errors include underestimating wind and temperature, starting too late for the intended light, and ignoring route complexity—short doesn’t mean simple. Other pitfalls: poor footwear for exposed scree, insufficient navigation when ridgelines fork, and overpacking heavy gear that slows you down. The easiest ways to avoid these are: check orientation and wind forecast, pack a windproof layer and microspikes if needed, and read recent trip reports for current route conditions.